Master how to wash cloth diapers with our complete 2026 guide. Learn proper washing techniques, drying methods, and effective stain removal solutions.
Picture this: It’s 2 AM, and you’re standing in your laundry room, staring at a mountain of soiled cloth diapers, wondering if you’ve made a terrible mistake. The stains look permanent, the smell is overwhelming, and you’re pretty sure you’ve forgotten every piece of advice you read before your baby arrived. Sound familiar?
Here’s the truth: mastering how to wash cloth diapers doesn’t require a PhD in laundry science. With the right cloth diaper washing guide and a solid routine, you’ll be handling cloth diaper stain removal like a pro in no time. In fact, thousands of parents in 2026 are discovering that washing cloth diapers is actually simpler than they imagined—once they understand the basics.
This comprehensive cloth diaper washing guide will walk you through everything you need to know about keeping your cloth diapers clean, fresh, and stain-free. Whether you’re a cloth diaper newbie or looking to troubleshoot your current routine, you’ll find practical, tested strategies that actually work.
Key Takeaways
- Wash every 2-3 days using a four-step process: solid waste removal, cold prewash, hot main wash, and proper drying to prevent odor and maintain diaper integrity
- Temperature matters: Use warm water (90-104°F) for best results, never exceeding 130°F to protect PUL, microfiber, and bamboo fabrics from degradation
- Sunlight is your secret weapon for natural stain removal and sanitization—it works better than most commercial stain removers
- Skip fabric softeners completely as they coat fibers and dramatically reduce absorbency, leading to leaks
- Use proper detergent amounts: Full doses for heavily soiled loads, with slightly more needed for free & clear or plant-based formulas
Understanding the Basics: Why Cloth Diaper Washing Is Different
The Science Behind Clean Diapers
Cloth diapers aren’t just regular laundry. They’re subjected to some of the toughest stains and bacteria that any fabric will ever face. Unlike your favorite t-shirt, diapers need to be both thoroughly sanitized and fully absorbent after each wash cycle.
The challenge? Achieving both goals without damaging the specialized fabrics that make cloth diapers work. Materials like polyurethane laminate (PUL), microfiber, bamboo, and hemp all have specific care requirements that differ from standard cotton clothing[1].
Think of it this way: washing cloth diapers is like maintaining athletic gear. You wouldn’t throw your technical running shirt in with fabric softener and expect it to wick moisture effectively afterward. The same principle applies to diapers—the wrong products or methods can compromise their performance.
Common Myths That Lead to Washing Mistakes
❌ Myth #1: “More detergent means cleaner diapers”
Reality: Excess detergent creates buildup that traps bacteria and causes repelling issues.
❌ Myth #2: “Hot water always damages cloth diapers”
Reality: Moderate hot water (104-140°F) is safe and effective when used correctly[2][4].
❌ Myth #3: “You need special cloth diaper detergent”
Reality: Regular mainstream detergents often work better than specialty brands.
❌ Myth #4: “Bleach ruins cloth diapers”
Reality: Occasional bleach treatments (when needed) are safe and recommended for sanitization.
The Complete Cloth Diaper Washing Guide: Step-by-Step Process
Step 1: Proper Storage Before Washing
Before you even think about your washing machine, you need a solid storage system. The key is airflow—trapped moisture creates the perfect breeding ground for ammonia-producing bacteria[1].
The Dry Pail Method (Recommended):
- Use a breathable hamper or pail with ventilation holes
- Keep the lid slightly open or use a mesh liner
- Store in a well-ventilated area
- Never seal diapers in airtight containers
Pro tip: Line your pail with a washable pail liner that goes directly into the wash with your diapers. This eliminates touching soiled diapers and makes laundry day infinitely easier.
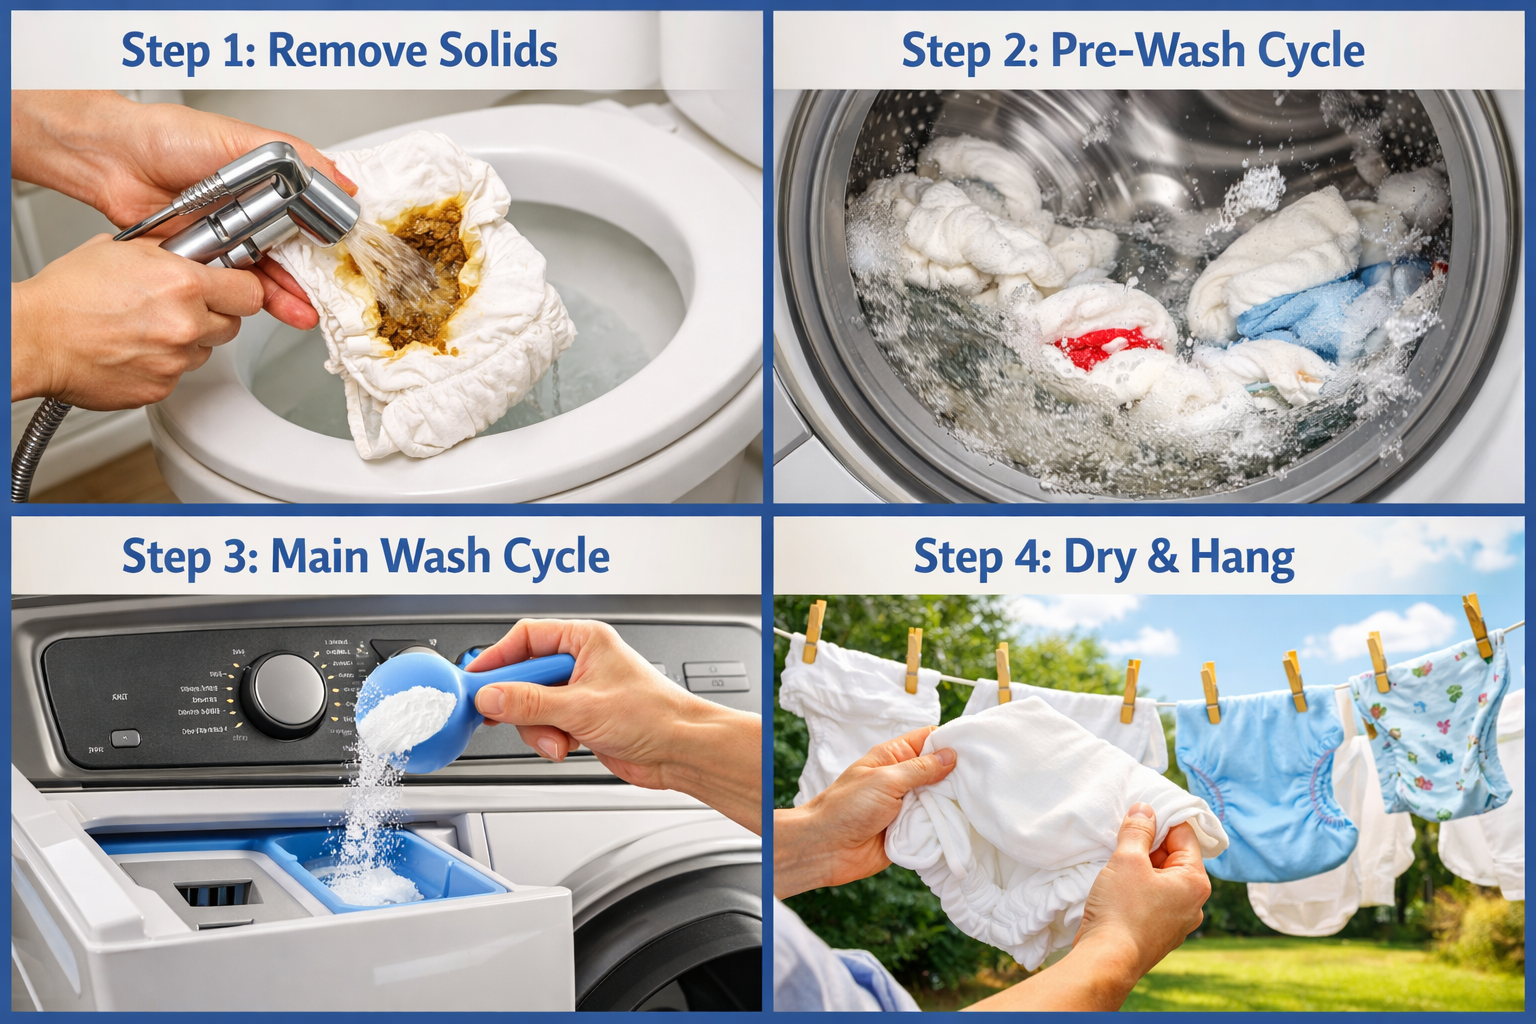
Step 2: Removing Solid Waste
Let’s address the elephant in the room—yes, you need to remove solid waste before washing. But it’s not as bad as you think!
For Exclusively Breastfed Babies:
Good news! Breastmilk poop is water-soluble and doesn’t need to be removed. Toss the diaper directly into your pail[1].
For Formula-Fed or Solid-Food Babies:
You have several options:
- The Dunk and Swish: Hold the diaper by the clean end and swish in toilet water (old-school but effective)
- Diaper Sprayer: Attach a sprayer to your toilet line for hands-free rinsing (game-changer!)
- Scraping Method: Use a spatula or scraper to knock solids into the toilet
- Disposable Liners: Use flushable or disposable liners to catch solids (though this adds ongoing costs)
After removing solids, rinse the diaper thoroughly and wring it out before storing[1]. This prevents staining and makes washing more effective.
Step 3: The Prewash Cycle—Your First Line of Defense
The prewash is non-negotiable in any effective cloth diaper washing guide. This cycle removes the bulk of urine and feces, preventing it from being redistributed during the main wash.
Optimal Prewash Settings:
- Temperature: Cold water works best to prevent protein stains from setting[3]
- Cycle: Quick wash or rinse/spin cycle
- Detergent: Use about 1/4 to 1/2 of your normal dose
- Water level: Enough to agitate diapers freely
Think of the prewash as the “gross stuff removal” cycle. You’re essentially giving your diapers a preliminary cleaning before the deep clean happens.
Common prewash mistake: Skipping this step to save time or water. Don’t do it! The prewash is what prevents that dreaded barnyard smell from developing.
Step 4: The Main Wash—Where the Magic Happens
This is where you’ll spend most of your attention when learning how to wash cloth diapers. The main wash needs to be hot enough to sanitize, long enough to clean thoroughly, and use enough detergent to remove all soil.
Optimal Main Wash Settings:
| Setting | Recommendation | Why It Matters |
|---|---|---|
| Temperature | 90-104°F (warm to hot) | Sanitizes without damaging fabrics[1][2] |
| Cycle | Heavy duty or cottons | Provides longest wash time and most agitation |
| Detergent | Full dose (line 3-5 on cap) | Heavily soiled loads need adequate cleaning agents[1] |
| Water level | High | Diapers need room to agitate and rinse thoroughly |
| Spin speed | Highest available | Removes maximum water for faster drying |
Temperature Deep Dive:
Research shows that 90°F offers the best balance for durability, while warm water up to 104°F (40°C) is perfectly acceptable[1][2]. You can use hotter water (104-140°F) for sanitization and tough stains, but never exceed 130°F for regular washing, as prolonged exposure significantly reduces the lifespan of PUL, microfiber, and bamboo fabrics[1].
Step 5: The Extra Rinse (When You Need It)
After the main wash, check your diapers. Do you see suds? Smell detergent? Then you need an extra rinse cycle.
When to add an extra rinse:
- Visible suds remain after the main wash
- Strong detergent smell persists
- You have soft water (requires less detergent)
- You’re using a high-efficiency (HE) machine
When to skip the extra rinse:
- No suds visible
- Clean, neutral smell
- You have hard water
- Your machine has a built-in extra rinse
Many parents make the mistake of always adding extra rinses “just to be safe.” This can actually under-rinse your diapers by diluting the detergent before it has a chance to work properly.
Buy Cloth Diapers by Clicking Below:
Choosing the Right Detergent for Cloth Diapers
What Makes a Good Cloth Diaper Detergent?
Forget what the cloth diaper manufacturers tell you about needing special detergent. The truth? Mainstream detergents often outperform “cloth diaper safe” brands.
Key characteristics of effective detergent:
- Contains surfactants (the actual cleaning agents)
- Includes enzymes for breaking down proteins and starches
- Has water softeners to combat hard water
- Free from fabric softeners or conditioners
- Adequate pH level for sanitization
Top-performing mainstream options:
- Tide (original or Free & Gentle)
- Persil
- Gain (original)
- All Free & Clear
- Kirkland Ultra Clean
How Much Detergent Should You Use?
This is where many cloth diaper washing guides get it wrong. The answer isn’t “use less”—it’s use the right amount for your water hardness and soil level.
General Guidelines:
- Heavily soiled loads (diapers): Full dose to line 3-5 on cap[1]
- Free & clear or plant-based detergents: Increase by 25-50%[1]
- Hard water: May need to increase amount or add water softener
- Soft water: Can reduce slightly, but don’t go below line 2
A parent named Sarah from Oregon shared her experience: “I was using barely any detergent because I was scared of buildup. My diapers started repelling and smelling terrible. When I switched to a full dose of regular Tide, the problems disappeared within two washes.”
Detergents to Avoid
🚫 Never use:
- Fabric softeners (liquid or sheets)
- Detergents with built-in fabric softener
- Homemade detergent recipes
- Soap nuts or soap-based products
- Detergents with heavy fragrances that mask odors
Fabric softeners coat the fibers of your diapers, making them repel liquid instead of absorbing it[1][2][4]. This is the fastest way to create leak problems and frustrated parents.
Mastering Cloth Diaper Stain Removal: Natural and Effective Methods
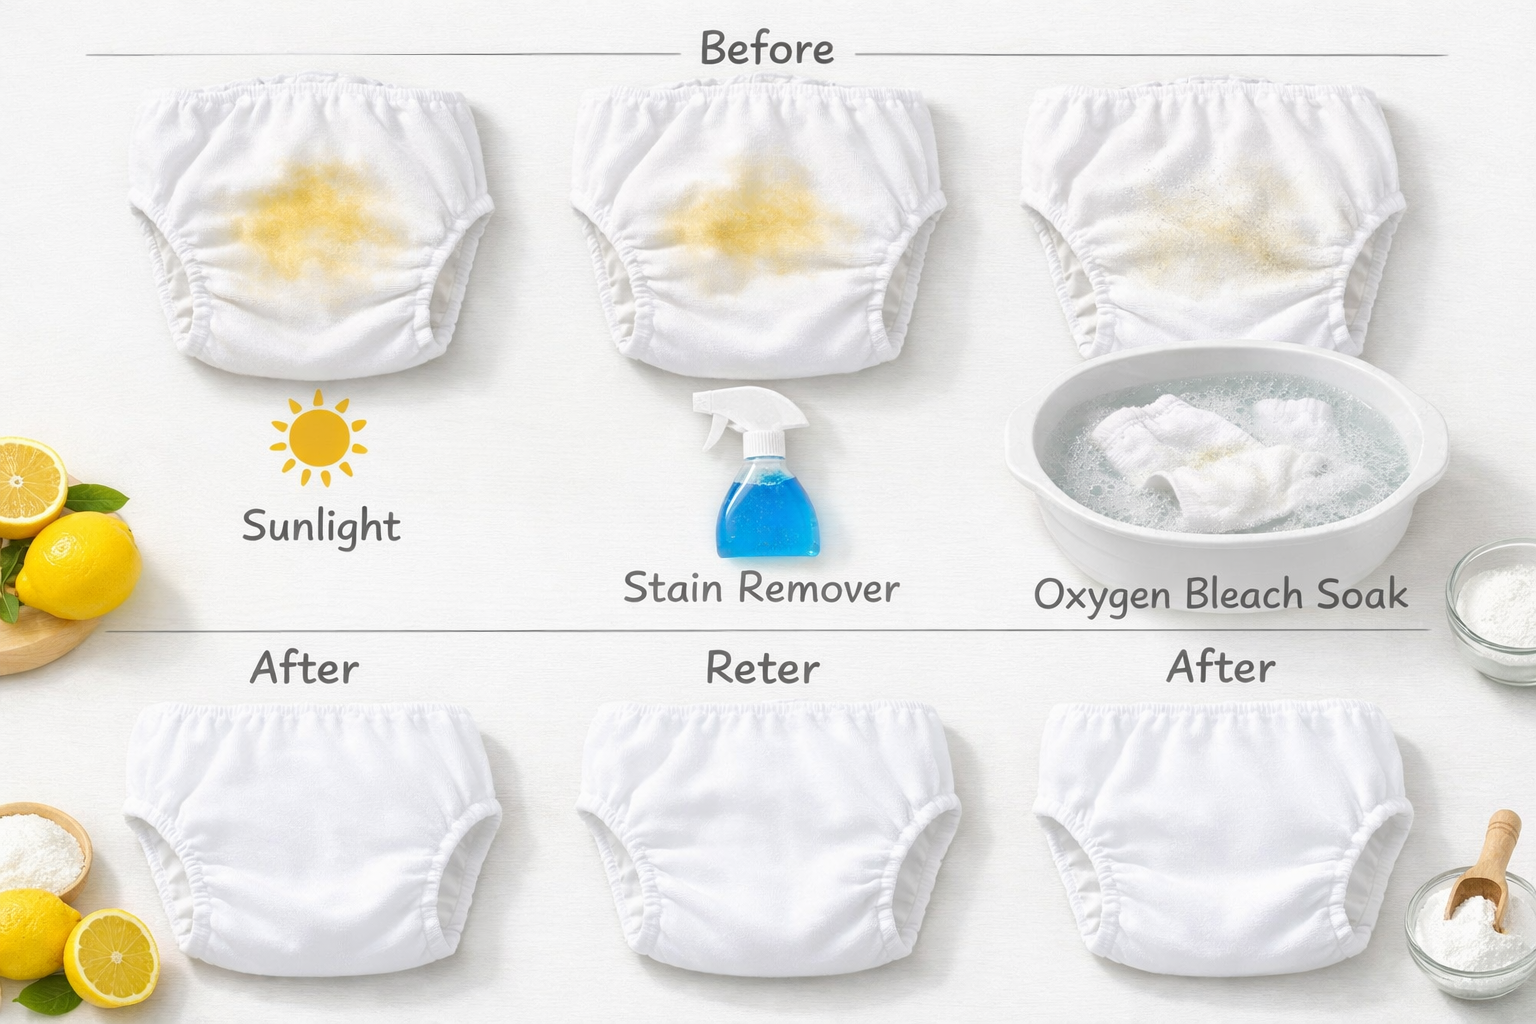
The Power of Sunlight: Nature’s Best Stain Remover ☀️
Here’s a secret that might surprise you: sunlight is more effective than most commercial stain removers for cloth diapers. The UV rays naturally bleach stains while also providing sanitization benefits[4].
How to sun your diapers:
- Hang wet, clean diapers outside in direct sunlight
- Position the stained area facing the sun
- Leave for 2-4 hours (or until dry)
- Watch stains fade before your eyes—sometimes completely disappearing
The science: UV radiation breaks down the molecular bonds in stain compounds, essentially erasing them from the fabric. It’s free, eco-friendly, and incredibly effective.
Winter or apartment dweller? Place diapers on a drying rack near a sunny window. It takes longer but still works! Even indirect sunlight provides some stain-fighting benefits.
Pre-Treating Stubborn Stains
Sometimes you need a little extra help before washing. Here are proven pre-treatment methods for cloth diaper stain removal:
Method 1: Cold Water Soak
- Rinse stained diaper in cold water immediately
- Soak in cold water for 30 minutes before storing
- Prevents stains from setting into fibers
Method 2: Oxygen Bleach Treatment
- Mix oxygen bleach (like OxiClean) with warm water
- Soak heavily stained diapers for 1-4 hours
- Wash as normal
- Safe for all diaper fabrics when used occasionally
Method 3: Dawn Dish Soap Spot Treatment
- Apply a tiny drop of original blue Dawn to stain
- Gently rub fabric together
- Rinse thoroughly before washing
- Use sparingly—dish soap can cause buildup
Method 4: Lemon Juice + Sun Combo
- Squeeze fresh lemon juice on wet stain
- Place in direct sunlight
- The acid + UV combination is incredibly powerful
- Rinse before washing
When to Use Bleach (And How to Do It Safely)
Bleach gets a bad reputation in cloth diaper communities, but used correctly, it’s a valuable sanitization tool.
When bleach is appropriate:
- Buying used diapers (always sanitize first!)
- After a yeast infection or illness
- Persistent ammonia smell that won’t resolve
- Major staining that other methods haven’t removed
Safe bleach protocol:
- Use regular chlorine bleach (not splashless or scented)
- Add 1/4 to 1/2 cup to main wash cycle
- Ensure extra rinse to remove all bleach residue
- Limit to once monthly maximum for regular maintenance
- Always follow with thorough rinsing
Important: While bleach is safe when used occasionally, frequent use will degrade elastic and PUL over time. Save it for when you really need it.
Drying Cloth Diapers: Methods and Best Practices
Line Drying: The Gold Standard
Line drying offers multiple benefits beyond just getting diapers dry:
✅ Stain removal: Sunlight naturally bleaches stains
✅ Energy savings: Zero electricity costs
✅ Extended lifespan: Gentle on fabrics and elastics
✅ Sanitization: UV rays kill bacteria
✅ Fresh scent: Natural outdoor smell
Line drying tips:
- Hang inserts and prefolds by corners to maximize sun exposure
- Hang covers and pockets inside-out to protect PUL from excessive UV
- Use a covered porch or shade for PUL items if concerned about degradation
- Bring diapers in slightly damp and finish in dryer for 10 minutes for softness
The crunchiness factor: Line-dried diapers can feel stiff, especially cotton and hemp. This is normal and doesn’t affect performance. A quick 10-minute tumble in the dryer (no heat) will soften them right up.
Machine Drying: Fast and Convenient
When time is tight or weather doesn’t cooperate, the dryer is your friend—with some important caveats.
Safe machine drying guidelines:
For Inserts, Prefolds, and Flats:
- Medium to high heat is fine
- Dry until completely dry
- These items can handle heat without damage
For Covers, Pockets, and All-in-Ones:
- Low to medium heat only
- Remove while slightly damp if possible
- High heat degrades PUL and elastic quickly
- Consider line drying these items exclusively
Pro tip: Separate your wash into two piles after washing—absorbent layers that can handle heat, and waterproof items that need gentle treatment. This lets you optimize drying for each type.
Indoor Drying Solutions
Living in an apartment or dealing with winter weather? Indoor drying works perfectly with the right setup:
Best indoor drying methods:
- Drying rack near heat vent: Fastest indoor option
- Dehumidifier room: Speeds drying and prevents mustiness
- Bathroom with exhaust fan: Good air circulation
- Laundry room with open window: Fresh air flow helps
Avoid: Drying in closed, humid spaces without air circulation. This can lead to mildew and musty smells.
Troubleshooting Common Washing Problems
The Dreaded Ammonia Smell 😤
You know it when you smell it—that eye-watering, nose-burning ammonia stench that hits you when you open a wet diaper. This is one of the most common issues parents face.
What causes ammonia:
- Insufficient detergent (not enough to remove all urine)
- Infrequent washing (bacteria multiply in stored diapers)
- Hard water preventing proper cleaning
- Detergent buildup trapping bacteria
How to fix it:
- Strip your diapers using a proper stripping routine
- Increase detergent amount in main wash
- Wash more frequently (every 2 days maximum)
- Add water softener if you have hard water
- Ensure adequate agitation in wash cycle
For a comprehensive solution, check out our detailed guide on how to get rid of ammonia smell in cloth diapers.
Repelling and Leaking Issues
When your previously reliable diapers suddenly start leaking, washing issues are often the culprit.
Common causes of wash-related leaks:
- Detergent buildup: Creates a water-resistant coating on fibers
- Fabric softener residue: Coats absorbent materials
- Mineral buildup: Hard water deposits prevent absorption
- Insufficient rinsing: Leftover detergent causes repelling
The fix: Most repelling issues resolve with a proper strip and bleach treatment, followed by adjusting your wash routine.
If you’re experiencing nighttime leaks specifically, the problem might not be washing-related. Learn more about why cloth diapers leak at night and how to fix it.
Buy Cloth Diapers by Clicking on the Picture below:
Barnyard or Fishy Odors
Clean diapers shouldn’t smell like anything—or at most, like your detergent. If they smell funky when clean, something’s wrong.
Barnyard smell causes:
- Not enough detergent
- Water temperature too low
- Insufficient agitation
- Wash cycle too short
Fishy smell causes:
- Too much detergent
- Hard water issues
- Certain detergents reacting with urine
Solution: Adjust your detergent amount and water temperature. Sometimes you need to experiment to find the sweet spot for your specific water and machine combination.
Diaper Rash Linked to Washing
Sometimes babies develop rashes that seem connected to diaper changes. While cloth diapers themselves don’t cause rash, washing issues can contribute.
Wash-related rash triggers:
- Detergent residue irritating sensitive skin
- Insufficient rinsing leaving chemicals on fabric
- Fragrances in detergent causing reactions
- Fabric softener residue
Prevention strategies:
- Switch to free & clear detergent formulas
- Add extra rinse if needed
- Ensure thorough rinsing in main wash
- Avoid any fabric softeners or dryer sheets
For more information about the relationship between cloth diapers and skin issues, read our guide on cloth diapers and diaper rash.
Special Considerations: Water Hardness and Machine Types
Understanding Your Water Hardness
Water hardness is the single most important factor in determining your ideal wash routine. Hard water contains minerals that interfere with detergent effectiveness.
Testing your water:
- Purchase water hardness test strips online ($10-15)
- Check your city’s water report (usually available online)
- Look for total hardness measured in ppm or grains per gallon
Water hardness categories:
- Soft: 0-60 ppm
- Moderately hard: 61-120 ppm
- Hard: 121-180 ppm
- Very hard: 180+ ppm
Adjusting for hard water:
- Increase detergent amount by 25-50%
- Add water softener (Calgon or borax) to main wash
- Consider installing a water softener system
- May need occasional stripping to remove mineral buildup
Adjusting for soft water:
- Can reduce detergent slightly
- Be careful not to over-rinse
- May need less aggressive wash settings
High-Efficiency (HE) vs. Traditional Machines
The type of washing machine you have significantly impacts how to wash cloth diapers effectively.
HE Top-Loaders:
- Use less water by design
- May need to add extra water manually
- Use HE detergent at full dose
- Longer wash cycles are beneficial
Traditional Top-Loaders:
- Best for cloth diapers (plenty of water and agitation)
- Can use any detergent type
- Easiest to achieve clean diapers
- Most forgiving of routine variations
HE Front-Loaders:
- Most water-efficient but can be challenging for diapers
- Require careful detergent selection
- May need to run additional rinse
- Ensure you’re using enough detergent despite HE designation
Pro tip: If you have an HE machine and struggle with clean diapers, try adding a wet towel to the prewash. This tricks the sensor into adding more water.
Preparing New Diapers: The First Wash
Before you use brand-new cloth diapers on your baby, they need special preparation. This isn’t just about cleanliness—it’s about priming the absorbent fabrics to work at maximum capacity.
Why Prep Washing Matters
New fabrics, especially natural fibers like cotton, hemp, and bamboo, contain natural oils and manufacturing residues that reduce absorbency. Washing removes these and “opens up” the fibers to absorb liquid[2][3].
What happens without proper prep:
- Diapers repel liquid instead of absorbing
- Leaks from day one
- Frustrated parents who think cloth diapers “don’t work”
Prep Washing Instructions by Fabric Type
Synthetic Fabrics (Microfiber, Suede Cloth, Athletic Wicking Jersey):
- Wash once in hot water with detergent
- Dry completely
- Ready to use!
Natural Fibers (Cotton, Hemp, Bamboo):
- Wash 3-5 times in hot water with detergent
- Can dry between washes or wash consecutively
- Absorbency continues improving through first 8-10 washes
- Don’t worry if they leak slightly at first—this is normal
Blended Fabrics:
- Follow the natural fiber protocol
- Better safe than sorry!
Time-saving tip: Prep new diapers by adding them to your regular laundry for several wash cycles. Just avoid washing with fabric softener or dryer sheets.
Creating Your Personalized Wash Routine
Now that you understand all the components, it’s time to create a wash routine that works for YOUR specific situation.
The Basic Framework
Every effective cloth diaper washing guide should include these core elements:
Wash Frequency: Every 2-3 days maximum[1][8]
Step 1 – Prewash:
- Cold or warm water
- 1/4 to 1/2 dose detergent
- Quick wash or rinse/spin cycle
Step 2 – Main Wash:
- Warm to hot water (90-104°F)[1][2]
- Full dose detergent
- Heavy duty or cottons cycle
- High water level
Step 3 – Extra Rinse (if needed):
- Cold or warm water
- No detergent
- Quick rinse cycle
Step 4 – Drying:
- Line dry in sun for stain removal
- OR low heat machine dry for convenience
- OR combination approach
Customizing for Your Situation
If you have hard water:
- Add Calgon or borax to main wash
- Increase detergent by 25-50%
- Consider monthly stripping routine
If you have soft water:
- May reduce detergent slightly
- Skip extra rinse unless suds present
- Be cautious about over-rinsing
If you have an HE machine:
- Use full dose HE detergent
- May need to manually add water
- Consider adding wet towel to prewash
If you have a newborn:
- Wash more frequently (daily or every other day)
- Exclusively breastfed poop doesn’t need removal
- May need gentler stain removal methods for sensitive skin
If you work full-time:
- Establish a consistent schedule (e.g., wash Monday, Wednesday, Friday)
- Keep enough diapers to go 3 days between washes
- Consider a diaper service for peak busy periods
Sample Wash Routines
Routine #1 – Traditional Top-Loader, Medium-Hard Water:
- Prewash: Warm, line 2 Tide, quick wash
- Main wash: Hot, line 4 Tide, heavy duty cycle
- Dry: Line dry covers, machine dry inserts on medium heat
Routine #2 – HE Front-Loader, Soft Water:
- Prewash: Cold, line 1 Tide Free & Gentle, speed wash
- Main wash: Warm, line 3 Tide Free & Gentle, cottons cycle, extra rinse
- Dry: All line dry
Routine #3 – HE Top-Loader, Very Hard Water:
- Prewash: Warm, line 2 Tide + Calgon, quick wash
- Main wash: Hot, line 5 Tide + Calgon, heavy duty
- Extra rinse: Cold, no detergent
- Dry: Sun dry for stains, finish in dryer 10 minutes
Eco-Friendly and Budget-Conscious Washing Tips
Reducing Water and Energy Consumption
Yes, cloth diapers use water—but they’re still more environmentally friendly than disposables when you wash efficiently.
Water-saving strategies:
- Wash full loads (combine with baby clothes if needed)
- Skip unnecessary extra rinses
- Use cold water for prewash
- Optimize your routine to avoid re-washing
Energy-saving strategies:
- Line dry whenever possible (free energy from the sun!)
- Use lower heat settings when machine drying
- Wash during off-peak electricity hours if you have time-of-use rates
- Air dry covers and shells exclusively
Cost comparison: Even with increased water and electricity use, cloth diapers save the average family $1,500-2,000 over disposables. The environmental impact is even more dramatic—one baby in disposables creates approximately 2,000 pounds of landfill waste.
Making Your Detergent Last Longer
Smart detergent shopping:
- Buy in bulk during sales
- Use store brands that perform well (Kirkland, Target’s Up&Up)
- Measure accurately—don’t eyeball it
- Adjust amount based on actual soil level
When you can use less detergent:
- Soft water situations
- Pee-only diapers (though these are rare!)
- Lightly soiled loads
When you need more detergent:
- Hard water
- Heavily soiled loads
- Free & clear or plant-based formulas
- Poop-heavy wash days
Buy Cloth Diapers by Clicking on the Picture Below:
Advanced Tips for Cloth Diaper Washing Success
Dealing with Yeast or Bacterial Infections
When your baby has a yeast infection or serious bacterial issue, your diapers need special treatment to prevent re-infection.
Yeast treatment protocol:
- Wash diapers in hottest water safe for fabrics
- Add 1/4 cup bleach to main wash
- Dry in hot dryer or direct sunlight
- Repeat for every wash during treatment period
- Do final bleach wash after infection clears
Prevention: Some parents add a small amount of bleach to every 4th or 5th wash as preventive maintenance.
Stripping and Bleaching: When and How
Stripping removes buildup (detergent, minerals, or fabric softener residue). Bleaching sanitizes and removes stains. They serve different purposes and use different methods.
When to strip:
- Diapers repel liquid
- Persistent odors after washing
- Visible buildup or greasiness
- After buying used diapers
How to strip (RLR method):
- Wash diapers normally
- Add RLR packet to hot wash with clean diapers
- Rinse, rinse, rinse until no suds remain
- Follow with bleach sanitization
When to bleach:
- After stripping
- Monthly maintenance (optional)
- After illness or infection
- Buying used diapers
How to bleach:
- Add 1/4 to 1/2 cup bleach to main wash
- Use hot water
- Run extra rinse cycle
- Ensure all bleach smell is gone before use
Washing Different Diaper Types Together
Can you wash prefolds with pockets? Covers with all-in-ones? The answer is usually yes, with some considerations.
Safe to wash together:
- All cotton items (prefolds, flats, fitted)
- Microfiber inserts with any other items
- Covers with any other items
- Pockets with any other items
Wash separately:
- Brand new items (especially natural fibers) for first few washes
- Heavily stained items you’re treating specifically
- Items that need different drying methods (though you can separate after washing)
The reality: Most parents wash everything together and it works fine. The key is using an effective wash routine that cleans everything thoroughly.
Maintaining Your Diapers for Longevity
Extending the Life of Your Cloth Diaper Investment
Quality cloth diapers should last through multiple children with proper care. Here’s how to maximize their lifespan:
Do’s:
✅ Wash every 2-3 days maximum
✅ Use appropriate water temperature
✅ Line dry when possible
✅ Store in breathable containers
✅ Remove solids promptly
✅ Use proper detergent amounts
Don’ts:
❌ Exceed 130°F water temperature regularly[1]
❌ Use fabric softeners ever
❌ Store wet diapers for more than 3 days
❌ Use homemade detergents
❌ Dry PUL on high heat
❌ Scrub aggressively at stains
Recognizing When Diapers Need Replacement
Even with perfect care, diapers eventually wear out. Here’s when to retire them:
Signs of worn-out diapers:
- Elastic no longer snaps back
- PUL is cracking, peeling, or delaminating
- Persistent leaking despite good fit
- Fabric is thin, torn, or has holes
- Velcro no longer sticks
- Snaps are loose or broken
Extending life: Many issues like worn elastic or broken snaps can be repaired! Search for cloth diaper repair tutorials or send to professional repair services.
Cloth Diaper Washing for Different Life Stages
Newborn Stage (0-3 months)
Newborns create frequent, small messes. This stage has unique washing considerations:
Frequency: Wash daily or every other day (you’ll have smaller loads)
Solid removal: None needed for exclusively breastfed babies—poop is water-soluble[1]
Stain prevention: Rinse in cold water immediately after change
Gentle approach: Newborn skin is extra sensitive, so consider free & clear detergents
Reality check: This is the hardest stage for cloth diapering due to sleep deprivation and frequent changes. Give yourself grace if you use some disposables during this time.
Mobile Baby Stage (6-12 months)
Once baby starts solids, everything changes in the diaper department.
Solid removal: Now required! Invest in a diaper sprayer—it’s worth every penny
Stain challenges: Food-based stains can be tougher than milk-only stains
Increased absorbency needs: May need to boost diapers, affecting wash routine slightly
Compression leaks: More common as babies become mobile. Learn about compression leaks in cloth diapers and how to prevent them.
Toddler Stage (1-3 years)
Toddlers produce adult-sized messes in tiny diapers. Washing becomes more important than ever.
Solid removal: Usually easier as poops become more formed
Odor control: Urine becomes more concentrated—wash every 2 days maximum
Stain fighting: Sun is your best friend during this stage
Potty training prep: Maintain good wash routine so diapers work well during this transition period
Troubleshooting: When Your Wash Routine Isn’t Working
How to Know Your Routine Needs Adjustment
Signs of a good wash routine:
- Diapers smell clean (like nothing or like detergent)
- No visible stains or residue
- Absorbency works as expected
- No rashes or skin irritation
- Diapers last through expected wear period
Signs your routine needs help:
- Ammonia smell when diaper gets wet
- Barnyard or fishy odor on clean diapers
- Repelling or leaking issues
- Persistent staining
- Recurring rashes
The Systematic Approach to Fixing Problems
When things go wrong, don’t panic and change everything at once. Use this methodical approach:
Step 1: Identify the specific problem (smell? stains? repelling?)
Step 2: Strip and bleach to reset your diapers to baseline
Step 3: Evaluate your water hardness (test if you haven’t)
Step 4: Adjust ONE variable at a time:
- Try more detergent
- If that doesn’t work, try different detergent
- If that doesn’t work, adjust water temperature
- If that doesn’t work, change wash cycle length
Step 5: Give each change 3-4 washes to evaluate effectiveness
Step 6: Document what works for future reference
Getting Help from the Cloth Diaper Community
You’re not alone in this journey! The cloth diaper community is incredibly supportive and knowledgeable.
Where to find help:
- Facebook groups dedicated to cloth diaper washing
- Fluff Love University (comprehensive washing resource)[6]
- Reddit’s r/clothdiaps community
- Your diaper brand’s customer service
- Local cloth diaper retailers
When asking for help, include:
- Your water hardness level
- Machine type (HE front-load, traditional top-load, etc.)
- Current detergent and amount used
- Current wash routine (step by step)
- Specific problem you’re experiencing
- What you’ve already tried
For parents just starting their cloth diaper journey, our comprehensive guide for eco-conscious parents provides additional context and support.
Quick Reference: Cloth Diaper Washing Cheat Sheet
The Essential Checklist
Before First Use:
☐ Prep wash natural fibers 3-5 times
☐ Prep wash synthetic fibers once
☐ Test water hardness
☐ Select appropriate detergent
Daily Routine:
☐ Remove solids from diapers
☐ Rinse and wring out
☐ Store in breathable dry pail
☐ Keep lid slightly open for airflow
Wash Day (Every 2-3 Days):
☐ Prewash: Cold/warm, 1/4-1/2 detergent, quick cycle
☐ Main wash: Warm/hot (90-104°F), full detergent, heavy duty
☐ Extra rinse: Only if suds remain
☐ Dry: Line dry or low heat machine dry
Monthly Maintenance:
☐ Check diapers for wear and damage
☐ Evaluate wash routine effectiveness
☐ Strip if needed (buildup, odors, repelling)
☐ Optional bleach sanitization
Quarterly Tasks:
☐ Deep clean washing machine
☐ Retest water hardness (can change seasonally)
☐ Inventory diaper condition
☐ Adjust routine as baby grows
Common Washing Mistakes to Avoid
Mistake #1: Not using enough detergent
Fix: Use full dose (line 3-5) for heavily soiled diaper loads[1]
Mistake #2: Washing too infrequently
Fix: Never exceed 3 days between washes[1][8]
Mistake #3: Using fabric softener
Fix: Eliminate completely—it ruins absorbency[1][2][4]
Mistake #4: Water temperature too hot
Fix: Keep below 130°F to protect fabrics[1]
Mistake #5: Over-rinsing
Fix: Only add extra rinse if suds are visible
Mistake #6: Ignoring water hardness
Fix: Test water and adjust detergent/softener accordingly
Mistake #7: Using homemade or “natural” detergents
Fix: Switch to proven mainstream detergent
Mistake #8: Skipping the prewash
Fix: Always prewash to remove bulk of soil[3]
Conclusion: Your Path to Cloth Diaper Washing Success
Learning how to wash cloth diapers effectively is like learning any new skill—it feels overwhelming at first, but becomes second nature with practice. The key is understanding that there’s no single “perfect” cloth diaper washing guide that works for everyone. Your ideal routine depends on your water hardness, machine type, detergent choice, and even your specific diaper brands.
Remember these fundamental principles:
🌟 Consistency is crucial: Establish a routine and stick with it for at least 2-3 weeks before making changes
🌟 Detergent is your friend: Don’t be afraid to use adequate amounts of quality mainstream detergent
🌟 Temperature matters: Warm water (90-104°F) provides the sweet spot of cleaning power without fabric damage
🌟 Sunlight is magic: For cloth diaper stain removal, nothing beats natural UV rays
🌟 Listen to your diapers: They’ll tell you when something’s wrong through odors, stains, or performance issues
The journey from confused beginner to confident cloth diaper parent happens faster than you think. That mountain of soiled diapers that seemed so intimidating? In a few weeks, you’ll be handling it on autopilot while simultaneously making breakfast and singing nursery rhymes.
Your Next Steps
This Week:
- Test your water hardness if you haven’t already
- Evaluate your current detergent choice
- Implement the basic four-step wash routine outlined in this guide
- Set up a proper dry pail storage system
This Month:
- Fine-tune your routine based on results
- Try sunning diapers for stain removal
- Join a cloth diaper community for ongoing support
- Document your successful routine for future reference
This Year:
- Maintain your established routine consistently
- Adjust as your baby grows and needs change
- Share your knowledge with other parents considering cloth
- Celebrate the money saved and environmental impact you’ve made
Final Encouragement
Every experienced cloth diaper parent was once standing exactly where you are now—uncertain, maybe a little overwhelmed, wondering if they could really make this work. The truth is, thousands of parents in 2026 are successfully washing cloth diapers in every type of machine, with every type of water, in every living situation imaginable.
You don’t need perfect conditions or expensive equipment. You need a solid understanding of the basics (which you now have), a willingness to adjust as needed, and a little patience as you find your groove.
The environmental impact of your choice matters. The money you’ll save matters. But perhaps most importantly, you’re proving to yourself that you can master new skills and make thoughtful parenting decisions even when they require extra effort.
Welcome to the cloth diaper community. You’ve got this! 💪👶🌍
References
[1] How To Wash Cloth Diapers – https://ecoable.net/how-to-wash-cloth-diapers/
[2] A Complete Guide To Washing Cloth Diapers – https://bayrli.com/blogs/resources/a-complete-guide-to-washing-cloth-diapers
[3] How To Wash Cloth Diapers – https://www.dreft.com/en-us/washing-tips/washing-baby-clothes/how-to-wash-cloth-diapers
[4] How To Wash Cloth Diapers – https://smartbottoms.com/pages/how-to-wash-cloth-diapers
[5] Washing Diapers – https://www.greenmountaindiapers.com/pages/washing-diapers
[6] How To Wash Cloth Diapers – https://fluffloveuniversity.com/how-to-wash-cloth-diapers/
[7] Washing Cloth Diapers – https://jilliansdrawers.com/pages/washing-cloth-diapers
[8] Cloth Diaper Washing Guide Diaper Duty Done Right – https://trulyfreehome.com/blog/cloth-diaper-washing-guide-diaper-duty-done-right