Create the perfect cloth-diaper-friendly changing station with our complete guide. Organization tips, storage solutions, and expert advice for parents.
Picture this: It’s 2 a.m., your baby is crying, and you’re fumbling in the dark trying to find a clean cloth diaper while simultaneously preventing a blowout disaster. Sound familiar? The difference between a chaotic diaper change and a smooth, efficient one often comes down to one thing: how well your changing station is set up. Creating a Cloth-Diaper-Friendly Changing Station isn’t just about having a cute nursery—it’s about designing a functional workspace that makes cloth diapering easier, faster, and more enjoyable for everyone involved. 🍼
Whether you’re a cloth diaper newbie or a seasoned pro looking to optimize your setup, having the right changing station can transform your diapering experience from stressful to streamlined. The good news? Setting up the perfect cloth diaper changing station doesn’t require a massive budget or a Pinterest-perfect nursery. It just requires some thoughtful planning, smart organization, and the right tools in the right places.
Key Takeaways
- Location matters: Choose a changing station spot that’s ergonomically comfortable and has easy access to water and laundry facilities
- Organization is everything: Use labeled bins, baskets, and vertical storage to keep clean cloth diapers, dirty ones, and accessories separate and accessible
- Stock the essentials: Your station needs clean cloth diapers, cloth wipes, a spray bottle, diaper cream, and a proper wet bag system
- Think workflow: Arrange items in the order you’ll use them during changes to create an efficient, one-handed-friendly system
- Adapt as you grow: Your changing station needs will evolve as your baby grows—plan for flexibility from newborn through toddlerhood
Why a Cloth-Diaper-Friendly Changing Station Makes All the Difference

Let’s be honest: cloth diapering has a learning curve. Unlike disposables that you can simply toss in the trash, cloth diapers require a bit more thought and organization. But here’s the secret that experienced cloth diapering parents know—the right setup eliminates 90% of the hassle.
Sarah, a mom of two from Portland, shares her experience: “With my first baby, I tried cloth diapers but gave up after three weeks. Everything was scattered, I was constantly searching for supplies, and it felt overwhelming. With my second, I invested time in creating a proper changing station before the baby even arrived. Game changer! Suddenly cloth diapering felt easier than disposables.”
A well-designed changing station serves multiple purposes:
- Reduces decision fatigue during those exhausting middle-of-the-night changes
- Speeds up the diaper changing process by having everything within arm’s reach
- Minimizes messes by containing supplies and dirty diapers in designated areas
- Encourages consistency in your cloth diapering routine
- Makes it easier for partners and caregivers to help with diaper changes
The investment in setting up your space properly pays dividends every single day—multiple times a day, in fact, considering newborns can go through 10-12 diaper changes daily!
Choosing the Perfect Location for Your Changing Station
Before you start buying storage bins and organizing supplies, you need to choose the right location. This decision will impact everything from your daily comfort to how efficiently you can handle the cloth diaper laundry routine.
Primary vs. Secondary Changing Stations
Most families benefit from having two changing stations: a primary one in the nursery or your bedroom, and a secondary one on another floor or in a frequently-used room. For cloth diapers specifically, your primary station should be your most well-stocked and organized space.
Primary Station Considerations:
- Close to where the baby sleeps (nursery or your bedroom)
- Near a bathroom or water source for rinsing and spraying
- Adequate lighting for nighttime changes
- Comfortable height to prevent back strain
- Sufficient storage space for your cloth diaper stash
Secondary Station Essentials:
- Living room or main floor location
- Smaller supply of diapers (5-7 cloth diapers)
- Basic changing supplies
- Small wet bag for temporary storage
The Water Access Factor 🚰
Here’s where cloth diapers differ significantly from disposables: water access matters. While you don’t need your changing station directly in the bathroom, proximity to water makes life easier for several reasons:
- Diaper spraying: If you use a diaper sprayer (highly recommended for solid waste), being near the toilet is convenient
- Quick rinses: Immediate rinsing of heavily soiled diapers prevents stains
- Hand washing: Easy access to wash hands thoroughly after changes
- Cloth wipe solution: Convenient for refilling spray bottles
Many parents find that setting up their changing station in a large bathroom or in a bedroom adjacent to a bathroom works beautifully. If that’s not possible, consider keeping a spray bottle of water at your changing station and a small bucket for soiled diapers that need immediate attention.
Ergonomics: Saving Your Back (Literally)
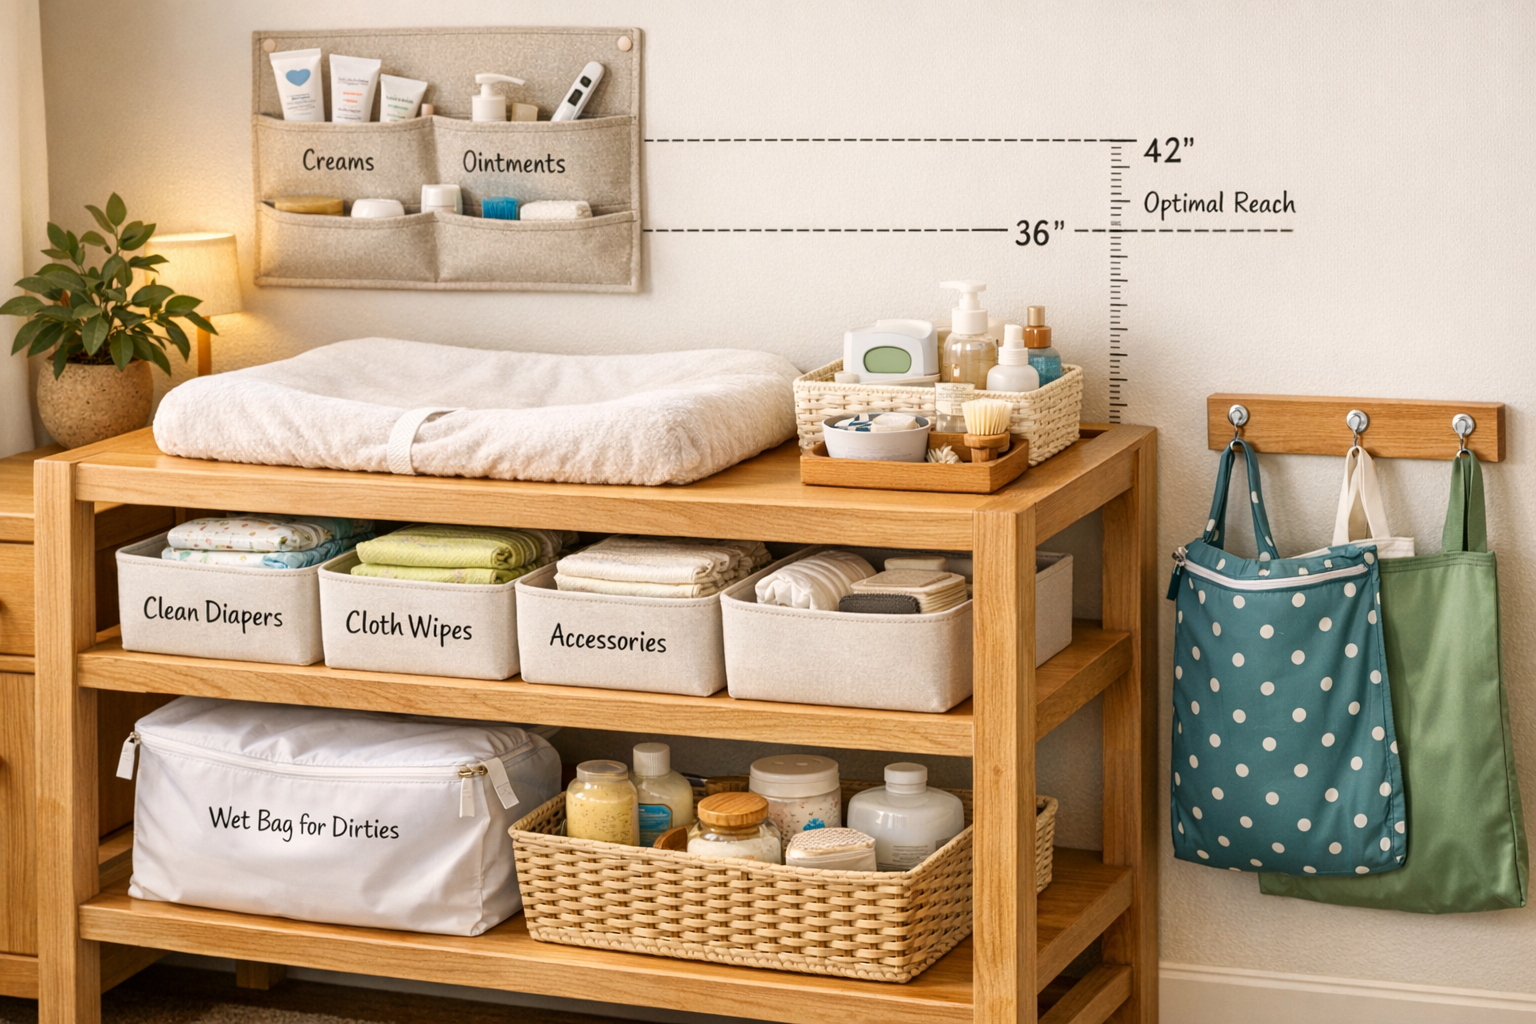
You’ll spend countless hours at your changing station over the next 2-3 years. Proper height is crucial to prevent back pain and strain. The ideal changing surface should be at waist height or slightly below—typically between 36-40 inches from the floor, depending on your height.
“After developing severe back pain from bending over a too-low dresser for changes, I invested in a proper changing table. The difference was immediate and dramatic. My physical therapist said proper changing station height is one of the most overlooked aspects of nursery setup.” – Marcus, dad of twins
Consider these ergonomic factors:
- Your height and your partner’s height: If there’s a significant difference, aim for a middle ground
- Flooring: If you’ll be standing on hard floors, add a cushioned mat
- Arm reach: Everything should be accessible without stretching or leaving the baby
- Lighting: Position lighting to illuminate the changing area without shining in baby’s eyes
Essential Components of a Cloth-Diaper-Friendly Changing Station
Now that you’ve chosen your location, it’s time to stock and organize your station. A well-equipped cloth diaper changing station has several key components that work together to create an efficient system.
The Changing Surface
Your changing surface is the foundation of your station. Options include:
Traditional Changing Tables: Purpose-built with safety rails and built-in storage. Look for models with:
- Safety straps
- Multiple shelves or drawers
- Sturdy construction (will hold weight as baby grows)
- Water-resistant changing pad
Dresser Toppers: A changing pad secured to a dresser provides:
- Dual functionality (storage + changing surface)
- Longevity (remove pad when done diapering, keep dresser)
- More storage capacity
- Often more aesthetically pleasing
Wall-Mounted Changing Stations: Great for small spaces:
- Fold down when needed
- Save floor space
- Require strong wall support
- Less storage but very functional
Whichever you choose, invest in a quality changing pad with a removable, washable cover. With cloth diapers, you’ll appreciate having multiple covers to rotate through the wash. Organic cotton or bamboo covers are soft, absorbent, and eco-friendly choices that align with cloth diapering values.
Storage Solutions That Actually Work
Organization is where most cloth diaper changing stations succeed or fail. The key is having designated spots for everything so you can grab what you need without thinking—crucial during those challenging diaper changes!
Clean Diaper Storage:
Use open baskets or bins that allow you to see and grab diapers quickly. Many parents organize by type:
- Basket 1: Prefolds and flats
- Basket 2: Fitted diapers
- Basket 3: Pocket diapers and all-in-ones
- Basket 4: Covers and shells
Alternatively, organize by size if you have multiple children in diapers or are in a transitional sizing period.
Cloth Wipes Station:
Keep cloth wipes in a separate container from diapers. Options include:
- Wipe warmer (filled with pre-moistened cloth wipes)
- Dry wipes in a basket with a spray bottle of wipe solution
- Small wet bag with damp wipes (change daily to prevent mildew)
Accessories Drawer or Caddy:
Gather all your small items in one organized space:
- Diaper cream (cloth-safe options only!)
- Snappi fasteners or diaper pins
- Doublers and inserts
- Diaper balm spatula
- Nail clippers and grooming items
- Thermometer
Dirty Diaper Management:
This is crucial for cloth diapers! You need a system that contains odors and keeps soiled diapers separate until wash day. Options include:
- Large hanging wet bag (most popular): Hang on a hook near the changing station, toss diapers directly in, throw the whole bag in the wash
- Diaper pail with washable liner: Traditional look, contains odors well, requires more space
- Two-bag system: One for wet diapers, one for soiled diapers that need spraying
Most experienced cloth diapering families swear by the hanging wet bag method for its simplicity. Keep at least two wet bags so you always have a clean one while the other is in the wash.
The Cloth Diaper Supply Checklist ✓
Here’s what should be stocked at your changing station at all times:
Daily Use Items:
- 8-12 clean cloth diapers (rotate from your full stash)
- 20-30 cloth wipes
- Spray bottle with water or wipe solution
- Cloth-safe diaper cream
- 2-3 clean covers (if using prefolds or flats)
- Extra inserts or doublers
Backup Supplies:
- Extra changing pad covers (2-3)
- Backup outfit for baby
- Backup shirt for yourself (trust us on this!)
- Small towel or cloth for containing messes
Cleaning Supplies:
- Surface-safe cleaning spray
- Paper towels or cleaning cloths
- Hand sanitizer
- Diaper sprayer (if nearby bathroom)
Creating an Efficient Workflow for Diaper Changes
Having the right supplies is only half the battle—how you arrange them determines how smoothly changes actually go. Think about the natural flow of a diaper change and position items accordingly.
The One-Handed Rule
Here’s a reality check: you’ll often have one hand on your baby (especially once they become wiggly) and only one hand free to grab supplies. Your changing station should be designed for one-handed operation.
Apply this rule:
- Most frequently used items should be within easy reach of your dominant hand
- Items should be grabbable without looking
- Containers should be easy to open with one hand
- Everything should have a designated “home” so you can replace it quickly
The Left-to-Right Workflow
Many parents find success organizing their station in the order they use items during a change:
Left side (or back left):
- Clean diapers
- Clean wipes
- Wipe solution
Center:
- Changing pad
- Baby
Right side (or back right):
- Diaper cream and accessories
- Dirty diaper receptacle
- Hand sanitizer
This creates a natural flow: grab clean supplies from the left, change baby in the center, dispose of dirty diaper to the right, sanitize hands, done!
Quick-Change Optimization
For those nighttime changes when you’re half-asleep, create a quick-change zone with absolute essentials:
- Small basket with 3-4 nighttime diapers (your most absorbent options)
- Container of pre-moistened wipes
- Diaper cream (if needed for your baby)
- Small wet bag for dirty diapers
Keep this basket on the top shelf or surface level so you can execute a change in dim lighting without searching through multiple storage areas. For more information on preventing nighttime issues, check out our guide on why cloth diapers leak at night and how to fix it.
Special Considerations for Different Cloth Diaper Types
Not all cloth diapers are created equal, and your changing station should reflect the specific types you’re using. Let’s break down storage and organization strategies for different cloth diaper systems.
All-in-One (AIO) and All-in-Two (AI2) Systems
These are the most similar to disposables in terms of changing station needs:
Storage approach:
- Stack or roll diapers vertically in a basket (file folder style) so you can see and grab each one
- Keep snaps facing forward for quick identification
- Separate by size if using multiple sizes
- No additional components needed at changing time
Changing station advantage: These systems require the least amount of changing station real estate since everything is integrated into one piece.
Pocket Diapers
Pocket diapers require a bit more organization since shells and inserts are separate:
Storage approach:
- Pre-stuff pockets after laundry so they’re ready to use
- Store stuffed diapers in a large basket
- Keep extra inserts in a separate small basket for heavy wetters or overnight
- Consider a small drawer for unstuffed shells if you prefer to stuff as you go
Pro tip: Many parents find that pre-stuffing all pockets during a weekly “prep session” while watching TV makes diaper changes much faster throughout the week.
Prefolds, Flats, and Covers
This system requires the most changing station organization but offers the most flexibility:
Storage approach:
- Basket 1: Folded prefolds or flats (consider pre-folding in your preferred fold)
- Basket 2: Clean covers (6-8 covers is usually sufficient)
- Small container: Snappi fasteners or pins
- Basket 3: Doublers or extra inserts for boosting absorbency
Changing station layout: Since you’ll be folding or fastening during changes, ensure you have adequate surface space beside the baby. Many parents keep a folding guide card laminated at the station until they master their preferred folding technique.
For those new to cloth diapering, our comprehensive guide to navigating the world of cloth diapers can help you choose the right system for your family.
Hybrid Systems
Many families use a combination of cloth diaper types. If this is you:
Storage approach:
- Organize by time of day (daytime diapers vs. nighttime diapers)
- Or organize by location (home diapers vs. outing diapers)
- Use clear labels on baskets so partners and caregivers know which to grab
- Keep your most-used system in the most accessible spot
Managing Dirty Diapers: The Wet Bag System
Let’s talk about what happens after the diaper change—because with cloth diapers, proper dirty diaper management is essential to your sanity and your home’s odor level!
Choosing the Right Wet Bags
Wet bags are waterproof bags designed to contain soiled cloth diapers until wash day. For your changing station, you’ll want:
Large hanging wet bag (primary dirty diaper storage):
- Capacity: Holds 15-20 diapers
- Features: Hanging loop, zipper or drawstring closure, waterproof lining
- Quantity needed: 2-3 bags minimum (one in use, one in wash, one backup)
Medium wet bag (for diapers that need spraying):
- Capacity: Holds 5-8 diapers
- Purpose: Temporary storage for soiled diapers until you can spray them
- Features: Easy-carry handle
Small wet bag (for the diaper bag):
- Capacity: Holds 3-5 diapers
- Purpose: When out and about
- Features: Compact, fits in diaper bag
The Spray-or-Not-to-Spray Question 💦
Here’s the deal: exclusively breastfed baby poop is water-soluble and doesn’t require spraying before washing. Once baby starts solids, you’ll need to remove solid waste before adding diapers to your wet bag.
Methods for handling solid waste:
- Diaper sprayer: Attaches to toilet, sprays waste directly into toilet bowl (most popular method)
- Dunk and swish: Old-school method using toilet water (free but less pleasant)
- Disposable liners: Catch solids, flush liner and waste (adds ongoing cost)
- Reusable fleece liners: Solids roll off, liner goes in wash (eco-friendly option)
Changing station setup for spray method:
- Keep medium wet bag at changing station
- Toss soiled diapers into this bag
- Once or twice daily, take bag to bathroom and spray diapers
- Transfer sprayed diapers to large wet bag
- Return empty medium bag to changing station
This system prevents you from running to the bathroom after every single diaper change while still keeping your main wet bag relatively clean.
Odor Control Strategies
Even with the best wet bags, odor can be an issue if not managed properly. Here’s how to keep your changing station (and nursery) smelling fresh:
Daily practices:
- Don’t seal wet bags completely—leave slightly open for airflow
- Wash cloth diapers every 2-3 days maximum
- Spray heavily soiled diapers promptly
- Keep wet bags away from heat sources (radiators, sunny windows)
Weekly maintenance:
- Wash wet bags with your diaper laundry
- Air out the changing station area
- Wipe down changing surface and surrounding areas
Problem-solving persistent odors:
- Check for ammonia buildup in diapers—this requires a strip wash
- Ensure adequate airflow in the room
- Consider a small air purifier near the changing station
- Evaluate your wash routine (insufficient washing causes odor issues)
Diaper Rash Prevention and Treatment at Your Changing Station
Cloth diapers are generally associated with lower rates of diaper rash, but it can still happen. Your changing station should be equipped to prevent and treat rash issues.
Cloth-Safe Diaper Creams
Important: Not all diaper creams are cloth-diaper-safe! Many conventional creams contain petroleum, zinc oxide, or fish oil that can create a water-repellent barrier on cloth diapers, causing them to repel liquid instead of absorb it.
Cloth-safe options to keep at your station:
- Coconut oil (pure, organic)
- Shea butter
- Calendula balm
- Cloth-safe commercial creams (CJ’s BUTTer, Grovia Magic Stick, etc.)
Application tip: Use a small spatula or popsicle stick to apply cream rather than your fingers. This keeps the cream container clean and prevents contamination.
Rash Prevention Setup
Create a rash prevention routine at your changing station:
- Thorough cleaning: Keep a spray bottle of plain water for gentle cleaning
- Complete drying: Have a soft cloth towel for patting baby completely dry before diapering
- Air time basket: Keep a waterproof pad and toys in a basket for regular diaper-free time
- Frequent changes: Set phone reminders if needed (every 2-3 hours for newborns)
For detailed information about preventing and treating diaper rash with cloth diapers, see our article on cloth diapers and diaper rash.
When Rash Happens: Treatment Station
If your baby develops a rash, your changing station should be ready:
Rash treatment additions:
- Disposable or reusable fleece liners (protect diapers from heavy creams if needed)
- Extra-gentle cloth wipes or soft washcloths
- Barrier cream (use with liner to protect diapers)
- Fan or hairdryer on cool setting for air drying
Temporary modifications:
- Increase change frequency
- Allow longer air-dry time between changes
- Switch to simpler diaper types if rash may be caused by sensitivity
- Keep a log of changes to identify patterns
Understanding cloth diaper rash causes and solutions can help you troubleshoot and prevent future issues.
Adapting Your Changing Station as Baby Grows
Your perfect changing station isn’t static—it needs to evolve as your baby grows from newborn to toddler. Let’s look at how to adapt your setup through different stages.
Newborn Stage (0-3 months)
Changing station priorities:
- Frequency: Changes every 1-2 hours means maximum organization is crucial
- Supplies: Stock more diapers at the station (newborns go through 10-12 daily)
- Comfort: Add a heating pad under changing pad cover (remove before placing baby) for cold months
- Lighting: Install a dim nightlight or use a red-light flashlight for nighttime changes
Special considerations:
- Newborn diapers are tiny—use smaller baskets to prevent them from getting lost in large containers
- Keep extra receiving blankets handy (newborns often have diaper changes that become full outfit changes)
- Have a small bowl or container for umbilical cord care supplies
Infant Stage (3-12 months)
Changing station evolution:
- Distraction station: Add a basket of special toys that only appear during diaper changes
- Safety: Babies become rollers and wigglers—always use safety strap, never step away
- Efficiency: This stage is about speed—organize for your fastest possible changes
- Solid foods impact: Once solids start, add your diaper sprayer setup and spray-method supplies
New additions:
- Teething toys (attached to changing station with clips)
- Small mirror mounted on wall above changing station
- Board books in a basket
- Mobile or hanging toy for distraction
Toddler Stage (12+ months)
Changing station transformation:
- Standing changes: Many parents transition to standing changes—consider a lower surface or changing pad on the floor
- Cooperation tools: Sticker charts, special songs, or reward systems
- Independence: Let toddler help choose their diaper or grab wipes
- Potty training prep: Add potty training supplies as you approach readiness
Toddler-specific modifications:
- More engaging distraction toys (light-up toys, cause-and-effect toys)
- Lower storage so toddler can participate in cleanup
- Clear expectations chart (visual schedule of diaper change steps)
- Transition supplies: training pants, smaller wet bags for accidents
Troubleshooting Common Cloth Diaper Changing Station Issues
Even with perfect setup, you’ll encounter challenges. Here are solutions to the most common issues:
Problem: Running Out of Clean Diapers at the Station
Solutions:
- Establish a restocking routine (every evening after dinner, for example)
- Keep a minimum number indicator (when you can see the bottom of the basket, it’s time to restock)
- Have a backup stash location nearby
- Adjust your wash schedule if you’re consistently running short
Problem: Wet Bag Odors Overwhelming the Room
Solutions:
- Wash diapers more frequently (every 2 days instead of 3)
- Ensure diapers are thoroughly rinsed before going in wet bag
- Check for compression leaks which can make diapers wetter than necessary
- Add a small open box of baking soda near (not in) the wet bag
- Improve room ventilation
Problem: Partner or Caregivers Avoid Cloth Diaper Changes
Solutions:
- Create a simple visual guide with photos
- Pre-assemble everything possible (stuffed pockets, pre-folded prefolds)
- Label everything clearly
- Start with the easiest cloth diaper types
- Have a short training session showing the routine
- Keep disposables as backup for emergencies (reduces anxiety)
Problem: Limited Space for Changing Station
Solutions:
- Use vertical space (wall-mounted shelves, over-door organizers)
- Choose multi-functional furniture (dresser with changing topper)
- Use rolling cart that can be moved when not in use
- Minimize your cloth diaper stash to essentials only
- Consider a fold-down wall-mounted changing station
Problem: Diaper Changes Taking Too Long
Solutions:
- Time yourself and identify bottlenecks in your process
- Pre-prep everything possible (pre-stuffed pockets, pre-folded prefolds)
- Ensure items are organized in order of use
- Practice your fastening technique (Snappi, pins, or snaps)
- Consider switching to easier diaper types for daytime use
Advanced Organization: Creating Systems That Work
Once you’ve mastered the basics, these advanced organizational strategies can take your cloth-diaper-friendly changing station to the next level.
The Rotation System
Instead of randomly grabbing diapers, implement a rotation system to ensure even wear:
Method 1: The File System
- Store diapers vertically like files
- Always take from the front
- Add clean diapers to the back
- Ensures oldest diapers get used first
Method 2: The Basket Swap
- Use two baskets: “Use First” and “Use Second”
- Empty “Use First” completely before starting “Use Second”
- When restocking, clean diapers go into whichever basket is empty
- Prevents favorites from being overused while others sit unused
The Labeling Strategy
Labels transform a good changing station into a great one:
What to label:
- Basket contents (“Newborn Prefolds,” “Size 1 Pockets,” “Night Diapers”)
- Wet bags (“Spray First,” “Ready for Wash”)
- Drawers (“Doublers & Inserts,” “Covers,” “Accessories”)
- Diaper cream (“Cloth Safe” vs. “Use with Liner”)
Labeling tips:
- Use a label maker for professional look
- Include photos for visual learners (great for caregivers)
- Use color coding (green = clean, red = dirty)
- Make labels large enough to read at a glance
The Inventory Management System
For the truly organized, tracking your cloth diaper inventory prevents surprises:
Simple method:
- Keep a small notepad at changing station
- Tally mark when you grab the last 2-3 diapers from a category
- Restock that evening
Digital method:
- Use a notes app on your phone
- Track when diapers go into wash
- Calculate when they’ll be ready for use again
- Set reminders for restocking
Visual method:
- Use clear containers so you can see supply levels
- Place a colored card at the “restock now” level
- When you see the card, it’s time to refresh supplies
Creating a Portable Changing Station for Multi-Room Living
Most families need diaper changing capabilities in multiple locations. Here’s how to create satellite stations without duplicating your entire setup.
The Changing Caddy
A portable caddy allows you to bring essentials to any room:
Caddy contents:
- 3-4 cloth diapers
- Small pack of cloth wipes
- Travel-size wipe solution spray
- Small container of diaper cream
- Portable changing pad
- Small wet bag
- Hand sanitizer
Best caddy types:
- Shower caddy with handle (waterproof, easy to clean)
- Small diaper bag or tote
- Rolling cart (for larger homes)
- Hanging organizer that moves between rooms
Strategic Supply Placement
Rather than one mega-station, consider distributed supplies:
Living room setup:
- Small basket under coffee table with 5-6 diapers
- Wet bag hanging on nearby door
- Wipes in decorative box
Bedroom setup:
- Full changing station with complete supplies
- Primary wet bag location
- All accessories and backup supplies
Bathroom setup:
- Diaper sprayer
- Medium wet bag for spray-first diapers
- Extra wipes for cleanup
This distributed approach means you’re never far from what you need, but you’re not maintaining multiple complete stations.
Budget-Friendly Changing Station Setup
Creating an effective cloth-diaper-friendly changing station doesn’t require breaking the bank. Here’s how to do it affordably:
Furniture Options Under $100
DIY changing table:
- Repurpose a sturdy dresser you already own ($0)
- Add a changing pad ($25-40)
- Add a changing pad cover ($10-15)
- Total: $35-55
Minimalist approach:
- Changing pad on floor ($25-40)
- Wall-mounted shelves for storage ($20-30)
- Hooks for wet bags ($5-10)
- Total: $50-80
Thrift store finds:
- Used changing table ($30-50)
- Refinish if needed ($20-30)
- New changing pad for hygiene ($25-40)
- Total: $75-120
Budget Storage Solutions
Free or nearly free options:
- Cardboard boxes covered in contact paper or fabric
- Repurposed shoe organizers
- Baskets from dollar stores
- Mason jars for small items
- Hanging shoe organizers on walls or doors
DIY wet bag alternative:
- Large waterproof laundry bag ($8-12)
- Hang on hook or in small trash can
- Wash with diapers
Prioritizing Your Purchases
If budget is tight, buy these items first:
- Changing pad and covers (safety and hygiene essential)
- One large wet bag (can wash frequently if you only have one)
- Basic storage baskets (organization is crucial)
- Cloth-safe diaper cream (rash prevention)
Add these as budget allows:
- Additional wet bags
- Specialized organizers
- Diaper sprayer
- Decorative elements
Remember, many successful cloth diapering families started with minimal setups and added items as they discovered what they actually needed. Don’t feel pressured to have everything perfect from day one.
Maintaining Your Changing Station: Weekly and Monthly Tasks
A changing station requires regular maintenance to stay functional and hygienic. Build these tasks into your routine:
Daily Maintenance (2-3 minutes)
- Wipe down changing surface
- Restock diapers if running low
- Empty wet bag if full (even if not wash day)
- Spot clean any spills or messes
- Replace cloth wipes if using pre-moistened system
Weekly Maintenance (10-15 minutes)
- Deep clean changing surface and pad
- Wash all changing pad covers
- Organize and tidy all baskets and drawers
- Check supplies and make shopping list
- Wash wet bags
- Rotate toys and distraction items
- Wipe down storage furniture
Monthly Maintenance (30 minutes)
- Evaluate what’s working and what’s not
- Reorganize based on baby’s current stage
- Deep clean all storage containers
- Check diaper stash for wear and tear
- Declutter items no longer needed
- Sanitize frequently touched surfaces
- Update labels if needed
Seasonal Deep Clean (1-2 hours)
- Remove everything from changing station
- Deep clean all furniture
- Wash or replace changing pad
- Evaluate and update entire organization system
- Donate or store outgrown items
- Refresh supplies for upcoming season
- Consider changes needed for baby’s next developmental stage
Making It Work for Your Family: Real Parent Setups
Every family’s perfect changing station looks different. Here are real examples from cloth diapering families:
The Minimalist Setup
Emma, mom of one:
“We live in a small apartment, so space is precious. My changing station is a changing pad on top of our dresser, two baskets (one for clean diapers, one for wipes), a small caddy for accessories, and a wet bag hanging on the bedroom door handle. That’s it. Everything we need, nothing we don’t. Total cost was under $60.”
The Multiple-Children Station
James, dad of three:
“With three kids in diapers (yes, including twins), organization is survival. We have a large rolling cart with five drawers: one for each child’s diapers, one for shared wipes and accessories, and one for backup supplies. Color-coded labels help us grab the right size quickly. The cart rolls between kids’ rooms as needed. Game changer for our chaos!”
The Luxury Setup
Priya, mom of two:
“I invested in a beautiful custom changing table with built-in storage, a warming drawer for wipes, and integrated lighting. It’s the most expensive piece of nursery furniture we bought, but we used it for both kids, and it made diaper changes feel less like a chore. The functionality was worth every penny, and it’s beautiful enough that it’ll become a regular dresser when we’re done with diapers.”
The Shared Space Solution
Marcus and Tim, dads of one:
“We don’t have a separate nursery—baby’s space is in our bedroom. We created a changing station in one corner using a narrow bookshelf with a changing pad on top. The shelves below hold all our cloth diaper supplies in matching baskets. It’s functional, doesn’t take much space, and actually looks good. The key was choosing furniture that matches our bedroom style.”
Conclusion: Your Perfect Cloth-Diaper-Friendly Changing Station Awaits
Creating the perfect Cloth-Diaper-Friendly Changing Station is one of the best investments you can make in your cloth diapering journey. While it might seem like just another item on your endless new-parent to-do list, a well-organized changing station transforms cloth diapering from potentially overwhelming to genuinely manageable—even enjoyable.
Remember these key principles as you set up your space:
✨ Location matters: Choose a spot that’s ergonomically sound and convenient to your daily routine
🧺 Organization is your friend: Everything needs a designated home, and that home should make sense for your workflow
💧 Plan for the realities of cloth: Water access, wet bag systems, and spray solutions aren’t optional—they’re essential
🔄 Stay flexible: Your perfect setup today will need adjustments as your baby grows and your family’s needs evolve
💰 Work within your budget: Expensive doesn’t mean better—thoughtful organization beats fancy furniture every time
The beautiful thing about cloth diapering in 2026 is that there’s no single “right way” to do it. Your perfect changing station will be uniquely suited to your space, your budget, your cloth diaper types, and your family’s lifestyle. Don’t be afraid to experiment, adjust, and completely reorganize if something isn’t working.
Your Next Steps
Ready to create your own Cloth-Diaper-Friendly Changing Station? Here’s your action plan:
- This week: Choose your changing station location and measure the space
- This weekend: Gather or purchase your changing surface and basic storage
- Before baby arrives (or this month if baby is here): Organize your cloth diaper stash and set up your wet bag system
- First month: Use your station and take notes on what works and what doesn’t
- Second month: Make adjustments based on your real-world experience
Remember, even experienced parents continue to refine their changing stations. Sarah, whom we heard from earlier, says it best: “I thought I had the perfect setup, then my baby started rolling. Then sitting. Then standing. Each stage required small tweaks. That’s not failure—that’s responsive parenting. Your changing station should grow with your child.”
For more guidance on your cloth diapering journey, explore our comprehensive guide to reusable diapers, which covers everything from choosing the right cloth diaper system to troubleshooting common issues.
Your cloth diapering journey is about to get a whole lot easier. Happy changing! 🌟
References
[1] American Academy of Pediatrics. (2024). “Diaper Changing Safety and Hygiene Guidelines.”
[2] Real Diaper Association. (2025). “Cloth Diaper Usage Statistics and Best Practices.”
[3] Environmental Protection Agency. (2025). “Waste Reduction Through Reusable Diaper Systems.”
[4] Journal of Pediatric Health. (2024). “Comparative Study of Diaper Rash Rates: Cloth vs. Disposable.”
[5] Occupational Safety and Health Administration. (2023). “Ergonomics in Childcare: Preventing Repetitive Strain Injuries.”